A well-designed garden bed isn’t just about color or plant variety—it’s about dimension. The most stunning landscapes draw the eye upward and outward with plants of varying heights that create depth, texture, and movement. Whether you’re working with a small backyard border or a sprawling perennial bed, layering height properly can make your garden look lush, balanced, and full of life.
If your garden feels flat or one-dimensional, adding vertical interest is the secret to transforming it. Here’s how to use layering techniques, plant selection, and smart design principles to add height—and drama—to your garden beds.
1. Understand the Concept of Layering
In nature, plants rarely grow in neat rows. They form natural layers, with taller species in the back, mid-sized plants in the middle, and low growers or groundcovers near the front. Replicating this in your garden adds visual flow and a sense of abundance.
The basic structure includes:
- Background layer (Tall plants): These form the backdrop—shrubs, ornamental grasses, or tall perennials.
- Middle layer (Medium height): Plants with mid-sized blooms or mounded shapes that provide color and body.
- Foreground layer (Low plants): Groundcovers or small flowering plants that soften the front edge.
This layering technique gives your beds depth from every angle and prevents the common “wall of plants” effect.
2. Start with a Strong Foundation: The Background Layer
The tallest layer anchors your bed and sets the tone for the entire design. Depending on your space and style, this can include flowering shrubs, tall grasses, or even small trees.

Best Choices for Background Height:
- Shrubs: Hydrangea paniculata, butterfly bush (Buddleia), or ninebark.
- Grasses: Miscanthus, switchgrass (Panicum virgatum), or feather reed grass (Calamagrostis).
- Perennials: Joe-Pye weed, delphinium, or hollyhock.
- Small trees: Japanese maple, dwarf conifers, or crepe myrtle for structure.
Tips for Success:
- Place taller plants toward the back of borders or the center of island beds.
- Use repetition of tall species to create rhythm and balance.
- Ensure tall plants don’t cast too much shade on shorter companions.
- Choose varieties that won’t overwhelm nearby species or block pathways.
Pro Tip: If your garden bed is visible from multiple sides, arrange taller plants in the center and layer outward in all directions.
3. Build the Middle Layer for Color and Texture
The middle layer bridges the height difference between tall backdrops and low groundcovers. This is often the most colorful part of your garden, where flowers bloom at eye level.
Excellent Middle-Layer Plants:
- Perennials: Coneflowers (Echinacea), black-eyed Susans (Rudbeckia), daylilies, or Shasta daisies.
- Compact shrubs: Boxwood, lavender, or dwarf spirea.
- Ornamental grasses: Blue fescue, fountain grass, or little bluestem.
- Herbs: Sage, oregano, or rosemary for edible interest.
Design Tips:

- Use a mix of shapes and textures—spikes, mounds, and airy stems—for contrast.
- Include plants with different bloom times to extend visual interest through the seasons.
- Repeat key plants or colors to unify the bed’s appearance.
This middle section should feel full and balanced without crowding the backdrop. It’s also a great zone to play with color palettes—soft pastels for a calming look, or bold reds and purples for energy and contrast.
4. Finish with Ground-Hugging Foreground Plants
The front layer is where your design meets the viewer’s eye. Low-growing plants soften hard edges and provide continuity between the garden bed and pathways or lawn.
Top Foreground Choices:
- Flowering groundcovers: Creeping thyme, phlox subulata, or sedum.
- Low perennials: Coral bells (Heuchera), hostas, or dwarf coreopsis.
- Edging plants: Lamb’s ear, dianthus, or ajuga.
These plants help create a lush, polished look and reduce soil erosion or weed growth. Choose species that contrast with mid-layer plants in color or texture to make transitions more noticeable.
Tip: Use curved bed edges instead of straight lines—the natural flow enhances the layered effect and guides the viewer’s eye smoothly through the design.
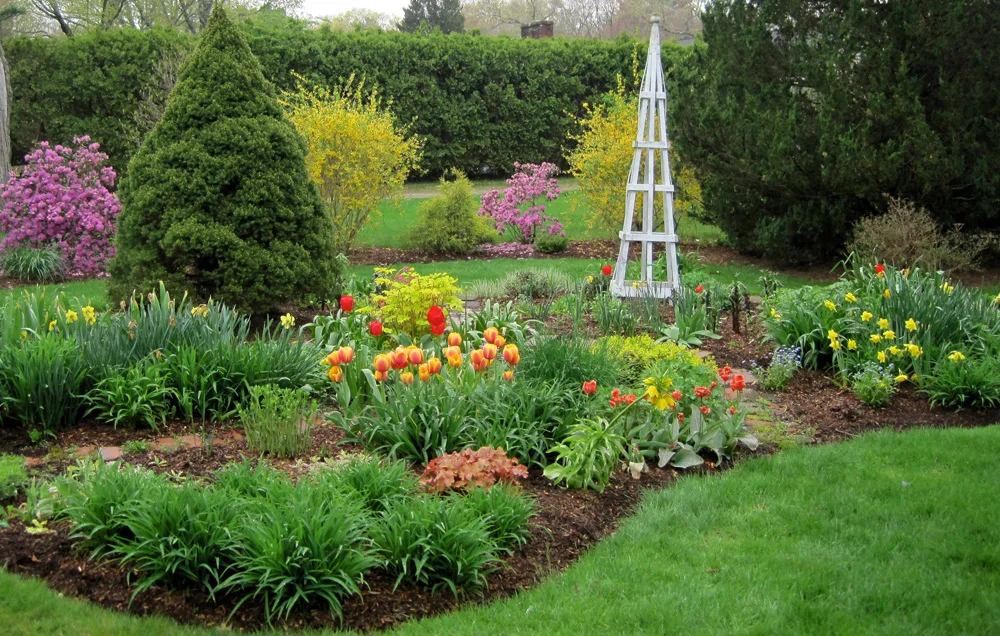
5. Add Vertical Accents for Extra Drama
Even within a layered layout, adding vertical features gives your garden a striking focal point. These elements break the horizontal rhythm and draw the eye upward.

Vertical Ideas:
- Trellises or obelisks with climbing roses, clematis, or morning glories.
- Tall, narrow plants like foxglove, allium, or lupine interspersed for contrast.
- Garden sculptures, urns, or birdbaths that rise above plant height.
- Small trees (like dwarf Japanese maple or ornamental olive) for elegance and shade.
Be strategic—too many tall elements can feel cluttered. Instead, repeat one or two vertical features throughout the garden to create continuity.
6. Play with Texture, Color, and Form
Height is just one part of layering; texture and form are equally crucial for visual harmony. Mix different leaf shapes—broad hosta leaves, feathery ferns, spiky irises—to add complexity and rhythm.
Combining Forms:
- Pair vertical plants (like irises) with rounded forms (like peonies).
- Use fine-textured grasses to balance large-leaved perennials.
- Blend matte foliage with glossy leaves for subtle variation.
For color layering, transition smoothly from cool tones at the back (blues and purples) to warmer ones near the front (yellows and pinks). This gradient creates a sense of depth, even in compact spaces.
7. Account for Growth Over Time
One of the biggest mistakes gardeners make is ignoring how plants mature. A perfectly layered bed in spring can turn into an overgrown mess by midsummer if plants outgrow their space.

Plan Ahead:
- Read plant labels to know mature height and width.
- Space plants generously to allow for full growth.
- Prune or divide perennials regularly to maintain structure.
- Replace fast-spreading groundcovers if they start crowding others.
Think of your garden as a living composition—always evolving but guided by structure and intention.
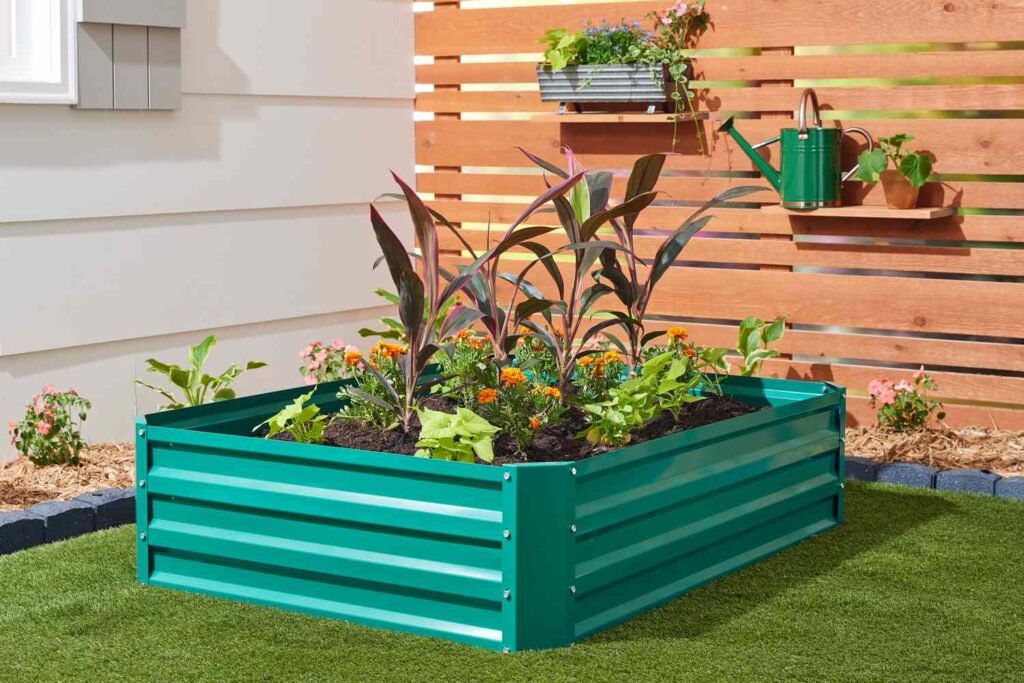
8. Use Hardscaping and Elevation for Added Height
You don’t have to rely solely on plants to create height. Hardscape features and elevation changes can elevate (literally) your design.
Creative Height Boosters:
- Build raised beds or terraces for natural vertical separation.
- Place containers or decorative pots at varying levels.
- Use retaining walls or stone borders to define tiers.
- Add a small arbor or pergola for climbing plants and visual framing.
These structural layers not only improve aesthetics but also make maintenance easier by improving drainage and accessibility.
9. Layer Seasonally for Year-Round Appeal
To keep your garden beds lively beyond summer, mix plants that shine in different seasons:

- Spring: Tulips, daffodils, and hostas.
- Summer: Coneflowers, hydrangeas, and ornamental grasses.
- Fall: Asters, sedums, and switchgrass.
- Winter: Evergreen shrubs, red twig dogwood, or hellebores.
By overlapping bloom times and using evergreen structure, your layered garden maintains interest in every season.
Final Thoughts
Adding layers of height to garden beds is about more than stacking tall and short plants—it’s about creating a dynamic, living composition. By blending different heights, textures, and colors, you bring balance and rhythm to your landscape.
Start with a strong background, weave in a colorful middle, finish with a soft foreground, and punctuate with vertical elements for drama. With a thoughtful plan and a little patience, your garden will evolve into a multi-dimensional masterpiece—beautiful from every angle and every season.
When designed with height in mind, your garden doesn’t just grow—it comes alive.