Halloween is the perfect time to get creative in the kitchen — and what better way to impress your guests than with spooky and fun Mummy Veg Pockets? These golden, flaky pastries, wrapped to look like mini mummies, are filled with savory vegetables and cheese, making them a perfect combination of festive and delicious.
Whether you’re planning a themed dinner, hosting a Halloween party, or just want to make something fun with the kids, these Halloween veggie pockets are simple, flavorful, and guaranteed to bring smiles to the table.
Follow this 6-step guide to make your own flaky, flavorful mummy pockets that look creepy and taste amazing.
Step 1: Gather Your Ingredients
Before you begin, set up all your ingredients so you can work efficiently. This recipe uses common ingredients that are easy to find and simple to prepare.
Main Ingredients:
- 1 sheet puff pastry (store-bought or homemade)
- 1 tablespoon olive oil or butter
- 1 small onion, finely chopped
- 2 cloves garlic, minced
- ½ cup bell peppers, diced
- ½ cup carrots, grated
- ½ cup corn kernels
- ½ cup broccoli florets, finely chopped
- ½ cup mushrooms, chopped (optional)
- ½ teaspoon salt
- ¼ teaspoon black pepper
- ½ teaspoon Italian seasoning or oregano
- ½ cup shredded mozzarella or cheddar cheese
- 1 tablespoon tomato or pizza sauce
For Decoration:
- Black olives or peppercorns for the mummy eyes
- Egg wash (1 beaten egg + 1 tablespoon water) or milk wash for shine
Pro Tip: For a vegan option, use plant-based cheese and brush the pastry with olive oil instead of egg wash.
Step 2: Prepare the Veggie Filling

The filling gives these mummy pockets their flavor and heartiness. You want a mix of fresh veggies and melted cheese wrapped in a flaky crust.

- Heat the olive oil in a skillet over medium heat.
- Add the chopped onion and cook until soft and golden.
- Add the minced garlic and cook for 30 seconds until aromatic.
- Toss in all the vegetables — bell peppers, carrots, corn, broccoli, and mushrooms.
- Season with salt, pepper, and Italian herbs, then stir well.
- Cook for 5–6 minutes until the vegetables are tender but still slightly crisp.
- Add tomato or pizza sauce and mix it all together.
- Turn off the heat and let it cool slightly before adding cheese.
The filling should be flavorful, colorful, and slightly creamy.
Flavor Tip: Add a pinch of chili flakes or smoked paprika for a touch of heat that complements the sweetness of the vegetables.
Step 3: Roll Out and Cut the Puff Pastry
Now it’s time to create the pastry “bandages” that will give your pockets their mummy look.
- Let the puff pastry sheet thaw slightly if frozen.
- Sprinkle a little flour on your countertop and gently roll out the pastry until it’s about ¼ inch thick.
- Cut the sheet into rectangles, about 4×6 inches, depending on how large you want your mummy pockets to be.
Each rectangle will serve as one mummy pocket.
Shortcut: Crescent roll dough can also be used if you don’t have puff pastry. Just flatten and cut it into similar rectangles.
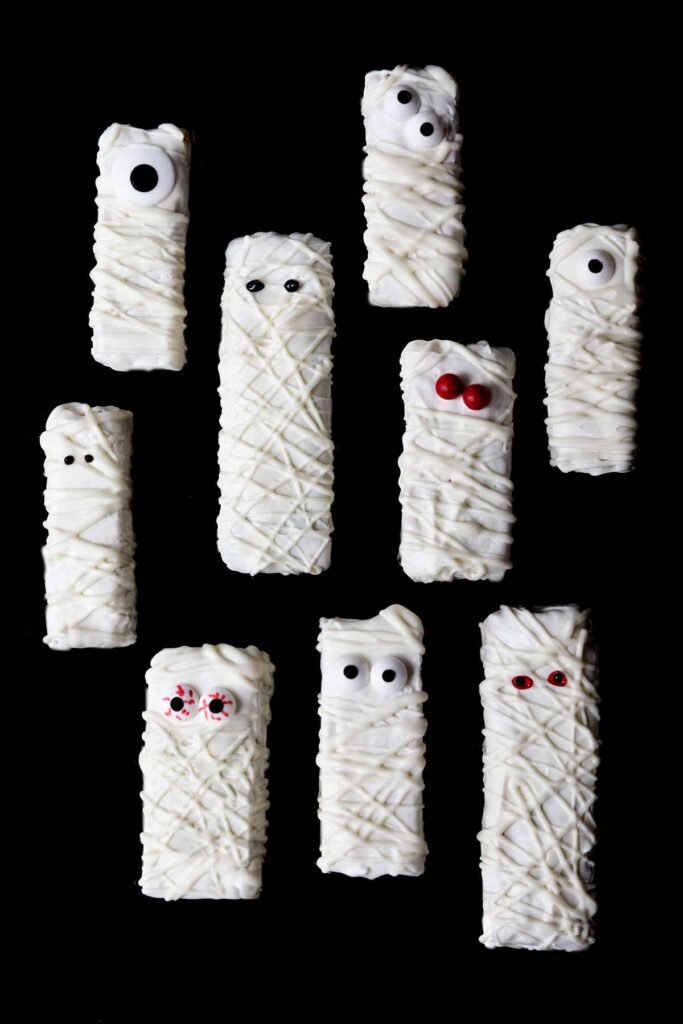
Step 4: Fill and Wrap Like a Mummy
Here comes the fun part — wrapping your veggie pockets to look like mini mummies!

- Place a pastry rectangle on your counter.
- Spoon about 2 tablespoons of the veggie filling into the center, leaving some space around the edges.
- Using a knife, cut diagonal strips (about half an inch wide) along both sides of the rectangle, stopping just before the filling.
- Fold the strips over the filling, alternating from side to side to create a crisscross mummy wrap pattern.
- Leave a small space near the top for the eyes.
- Gently press the edges to seal the ends.
Repeat this process for all your mummy pockets.
Visual Tip: The more uneven the wrapping, the better — it gives the mummies a fun, authentic look.
Step 5: Brush and Bake Until Golden
Baking transforms your wrapped mummies into crispy, golden perfection.
- Preheat the oven to 375°F (190°C).
- Line a baking sheet with parchment paper.
- Arrange the mummy pockets evenly on the tray.
- Brush the tops with egg wash or milk to help them brown beautifully.
- Bake for 18–20 minutes, or until the pastry is puffed and golden.
As they bake, your kitchen will fill with the buttery, savory aroma of baked pastry and herbs — the perfect scent for Halloween night.
Pro Tip: Avoid overcrowding the baking sheet so the pastry cooks evenly and stays crisp.
Step 6: Decorate and Serve Your Mummies

Once your mummy pockets are out of the oven and slightly cooled, it’s time to bring them to life!

- Add “eyes” using tiny dots of cream cheese or mayonnaise topped with sliced black olives or peppercorns.
- Place the mummies on a serving platter and pair them with fun dipping sauces like:
- Classic ketchup for a “bloody” look
- Avocado or spinach dip for a “slimy green” theme
- Warm cheese sauce for a “melted lava” effect
These mummy pockets look best when served warm — flaky on the outside, gooey on the inside, and delightfully spooky.
Serving Tip: Add small pumpkins, cobwebs, or fake spiders to your serving table for an extra Halloween touch.
Bonus: Fun Variations for Every Taste
The best part about this recipe is how customizable it is. You can easily adapt it for different dietary preferences or flavor cravings.
Cheesy Mummy Pockets
Add extra mozzarella or cream cheese for a gooey, melty center.
Healthy Veggie Mummies
Use whole-wheat or gluten-free pastry, and pack in spinach, tofu, or kale for a wholesome twist.
Meaty Mummy Pockets
Add cooked shredded chicken, ground turkey, or sausage with the vegetables for a heartier version.

Spicy Mummies
Add jalapeños, chili flakes, or a drizzle of hot sauce for an extra kick of flavor.
Kid Tip: Let children help with wrapping and decorating — it’s a fun, hands-on Halloween activity that also teaches them basic cooking skills.
Storage and Reheating Tips
If you’re planning ahead or have leftovers, these mummy pockets store and reheat beautifully.
- Refrigerate: Store in an airtight container for up to 3 days.
- Freeze: Once baked and cooled, you can freeze them for up to 2 months.
- Reheat: Warm in the oven at 350°F (175°C) for 8–10 minutes. Avoid microwaving — it softens the pastry.
Make-Ahead Tip: Assemble the mummy pockets before baking and freeze them uncooked. On Halloween night, just pop them into the oven — no prep needed!
Why Mummy Veg Pockets Are Perfect for Halloween
Here’s why this recipe deserves a spot at your Halloween dinner table:
- Fun and festive: They look spooky but taste amazing.
- Healthy and hearty: Packed with vegetables and wrapped in light puff pastry.
- Customizable: Great for vegetarians, vegans, or meat lovers.
- Kid-friendly: Perfect for cooking together as a family.
- Party-ready: Easy to serve, not messy, and guaranteed to impress.
From their flaky texture to their creepy little eyes, every bite of these mummy pockets is pure Halloween fun wrapped in cozy comfort.

Conclusion: Unwrap the Magic of Halloween
This Halloween, skip the store-bought snacks and try something homemade and creative. These Mummy Veg Pockets are easy to make, full of flavor, and fun for all ages. They’re festive enough for a Halloween dinner party, yet simple enough for a quick weeknight meal.
With their golden pastry “bandages” and cheesy veggie filling, they’re sure to steal the show at your spooky celebration. Serve them hot, enjoy the laughter and gasps of delight, and embrace the deliciously eerie magic of Halloween night.
So grab your rolling pin, gather your veggies, and cook up a batch of Mummy Veg Pockets that are scary good! 👻